


kubernetes部署是一个繁琐的过程,当然也可以使用第三方安装工具一键安装,但这不利于部署过程学习和自定义性,并且第三方工具或多或少都会有入侵性

安装:HAProxy和Keepalived
dnf install keepalived haproxy -y
备份配置文件
cp /etc/keepalived/keepalived.conf /etc/keepalived/keepalived.conf.bak
cp /etc/haproxy/haproxy.cfg /etc/haproxy/haproxy.cfg.bak
修改Keepalived配置
vim /etc/keepalived/keepalived.conf
每个master节点配置略不同
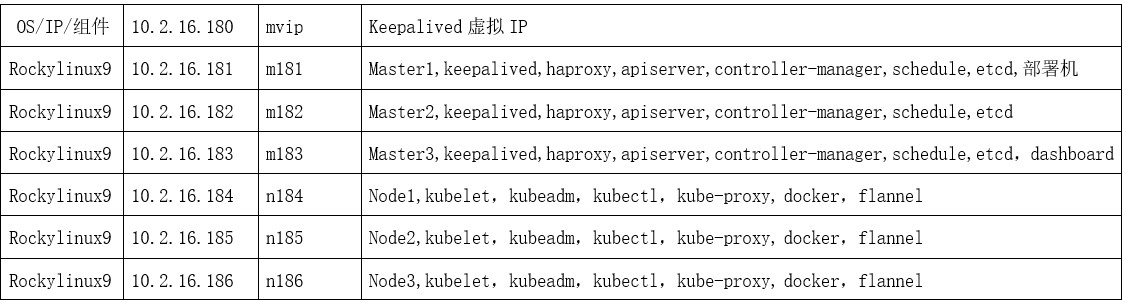
m181-master节点
! Configuration File for keepalived
global_defs {
   router_id m181.90
}

vrrp_script chk_haproxy {
 script " killall -0 haproxy"
 interval 3
 weight -50
  fall 3
  rise 1
}

vrrp_instance VI_1 {
    state MASTER
    interface ens18
    virtual_router_id 51
    priority 90
    advert_int 1
    authentication {
        auth_type PASS
        auth_pass 1111
    }
    virtual_ipaddress {
        10.2.16.180
    }

   track_script {
      chk_haproxy
   }
}
systemctl start keepalived && systemctl enable keepalived && systemctl status keepalived

m182-master节点
! Configuration File for keepalived
global_defs {
   router_id m182.80
}
vrrp_script chk_haproxy {
 script " killall -0 haproxy"
 interval 3
 weight -50
  fall 3
  rise 1
}

vrrp_instance VI_1 {
    state BACKUP
    interface ens18
    virtual_router_id 51
    priority 80
    advert_int 1
    authentication {
        auth_type PASS
        auth_pass 1111
    }
    virtual_ipaddress {
        10.2.16.180
    }

   track_script {
      chk_haproxy
   }
}
systemctl start keepalived && systemctl enable keepalived && systemctl status keepalived
m183-master节点
! Configuration File for keepalived
global_defs {
   router_id m183.70
}

vrrp_script chk_haproxy {
 script " killall -0 haproxy"
 interval 3
 weight -50
  fall 3
  rise 1
}

vrrp_instance VI_1 {
    state BACKUP
    interface ens18
    virtual_router_id 51
    priority 70
    advert_int 1
    authentication {
        auth_type PASS
        auth_pass 1111
    }
    virtual_ipaddress {
        10.2.16.180
    }

   track_script {
      chk_haproxy
   }
}
systemctl start keepalived && systemctl enable keepalived && systemctl status keepalived
修改HAProxy配置
vim /etc/haproxy/haproxy.cfg
所有master节点配置都相同
global部分无特殊需求可以不改
修改defaults、frontend和backend部分
#---------------------------------------------------------------------
# Example configuration for a possible web application.  See the
# full configuration options online.
#
#   https://www.haproxy.org/download/1.8/doc/configuration.txt
#
#---------------------------------------------------------------------

#---------------------------------------------------------------------
# Global settings
#---------------------------------------------------------------------
global
    # to have these messages end up in /var/log/haproxy.log you will
    # need to:
    #
    # 1) configure syslog to accept network log events.  This is done
    #    by adding the '-r' option to the SYSLOGD_OPTIONS in
    #    /etc/sysconfig/syslog
    #
    # 2) configure local2 events to go to the /var/log/haproxy.log
    #   file. A line like the following can be added to
    #   /etc/sysconfig/syslog
    #
    #    local2.*                       /var/log/haproxy.log
    #
    log         127.0.0.1 local2

    chroot      /var/lib/haproxy
    pidfile     /var/run/haproxy.pid
    maxconn     4000
    user        haproxy
    group       haproxy
    daemon

    # turn on stats unix socket
    stats socket /var/lib/haproxy/stats

    # utilize system-wide crypto-policies
    ssl-default-bind-ciphers PROFILE=SYSTEM
    ssl-default-server-ciphers PROFILE=SYSTEM

#---------------------------------------------------------------------
# common defaults that all the 'listen' and 'backend' sections will
# use if not designated in their block
#---------------------------------------------------------------------
defaults
    mode                    tcp
    log                     global
    option                  tcplog
    option                  dontlognull
    retries                 3
    timeout queue           1m
    timeout connect         10s
    timeout client          1m
    timeout server          1m
    timeout check           10s
    maxconn                 4000

#---------------------------------------------------------------------
# main frontend which proxys to the backends
#---------------------------------------------------------------------
frontend k8s-api
    bind *:16443
    default_backend          k8s-api-servers

#---------------------------------------------------------------------
# static backend for serving up images, stylesheets and such
#---------------------------------------------------------------------
# backend static
 # balance     roundrobin
 # server      static 127.0.0.1:4331 check

#---------------------------------------------------------------------
# round robin balancing between the various backends
#---------------------------------------------------------------------
backend k8s-api-servers
    balance     roundrobin
    option      tcp-check
    server m181 10.2.16.181:6443 check fall 3 rise 2
    server m182 10.2.16.182:6443 check fall 3 rise 2
    server m183 10.2.16.183:6443 check fall 3 rise 2
全局配置设定最大连接数4000,以haproxy用户运行
使用TCP模式,适合K8s API Server的端口通信
前端监听16443端口,后端采用roundrobin轮询算法到各master 6443端口
每个master节点配置健康检查(fall 3次失败标记为不可用)
若需HTTP负载均衡,可将mode改为http并添加X-Forwarded-For头选项
systemctl enable --now haproxy
配置发送给另两个master节点
for i in m182 m183 scp /etc/haproxy/haproxy.cfg root@$i:/etc/haproxy/haproxy.cfg
for i in m182 m183; do ssh root@$i "systemctl enable --now haproxy"; done
附加:HA状态监控配置 (可选)
listen stats
    bind *:9000
    mode http
    stats enable
    stats uri /haproxy?stats
    stats realm HAProxy\ Statistics
    stats auth admin:password
测试haproxy和keepalived,模拟故障

vip:10.2.16.180,默认在优先级高的m181节点
模拟m181的haproxy故障:pkill haproxy,vip跑到m182节点

当m181的haproxy恢复,systemctl start haproxy
vip重新回到m181节点

评论 (0)